Painting Instructions
for
Ragg's Logs
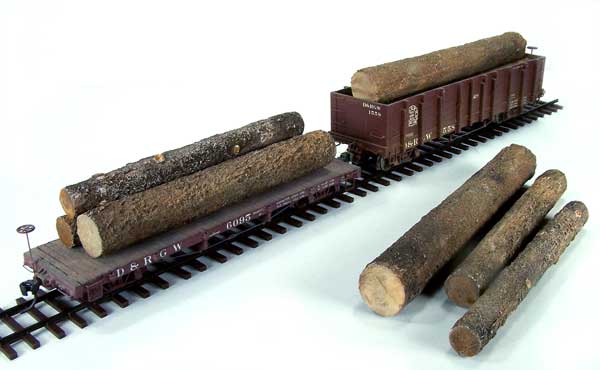
FINISHED LOGS LOADED INTO Sn3 CARS
The above photo illustrates the steps in
painting our resin logs. If you use the brands of products
mentioned below, your logs should come out looking very much the
same. I've tried to substitute different brands of the same
product, say, Raw Sienna, and found the colors can vary greatly from
one manufacturer to another. Don't be afraid to substitute
brands, but be aware that your results will probably be different and
you may have to adjust your technique. The brands mentioned are
generally available at most arts & crafts stores. I purchased
mine at Michael's.
Giving credit where credit's due, I'd like to thank the Pacific Coast Air Line Railway for getting me started on this project. This method loosely follows theirs as presented at www.pacificcoastairlinerr.com/grout_logs/.
Begin by using a hobby knife to scrape away any flash that may remain on the logs. The logs are made in "split" molds, so may have a bit of flash along the mold joints. (The logs cut, carve, drill, and sand easily.) It's best to wash the logs prior to painting in warm, soapy water to remove any release agent that may be present. Even though your logs may be white to start with (various resins have been used), prime them with a white-pigmented primer such as Kilz. Next, four washes are applied, allowing time to dry between each. I suggest using a flat brush with approximately 5/8-inch long (15-mm) x 3/8-inch (10-mm) wide bristles to apply the washes. I also prefer to use water-based paints for the logs -- they have a very fast drying time.
To apply a "wash", dab a bit of paint from the bottle/tube on a scrap of cardboard or some other waste material. Wet your log with clear water, dip or dab your brush into the paint, and brush some onto the log. The wetness of the log should help dissolve the paint and it should flow into the surface texture. Add a little clear water with your brush to get the paint to flow even better. Too much water, however, will allow most of the paint to flow to the lowest point -- something to avoid. If this happens, dab the area with a paper towel and start again.
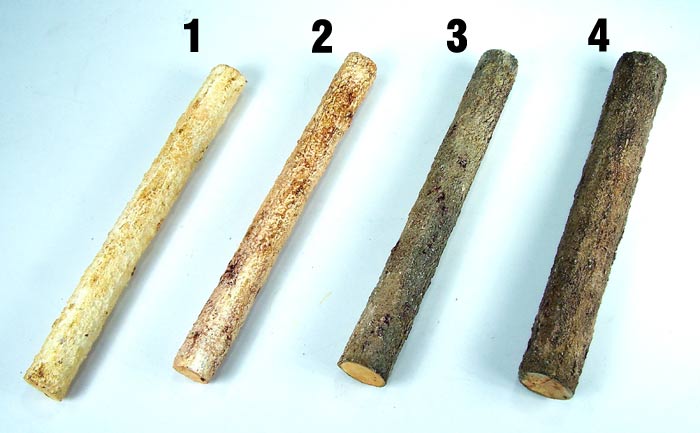
Once the primer has dried, apply a wash of Raw Sienna, as shown above on log 1. Be sure to paint the ends of the logs with this coat. Try to keep all subsequent washes AWAY from the ends. Once dry, add a wash of Burnt Sienna (log 2 in the photo). Too much Burnt Sienna may turn the log very red -- something you probably don't want. To bring the texture out, next apply a wash of Payne's Gray (log 3). This product goes on like a black paint, but dries considerably lighter -- a great advantage to those of us that tend to put too much of a good thing on our models. Finally, if you think your logs need it (it always improves mine), apply a wash of Burnt Umber (log 4). This is a dark brown color that really blends the other washes together and makes the bark look more realistic. Just don't over do it or the log will become too dark. Allow your logs to dry thoroughly.
THAT'S IT! Nothing to it!
Products used:
White Primer: Kilz (spray can)
Raw Sienna: Winsor & Newton's Artisan's Water Mixable Oil Color
Burnt Sienna: Winsor & Newton's Artisan's Water Mixable Oil Color
Payne's Gray: Winsor & Newton's Cotman Water Color
Burnt Umber: Americana (DecoArt)
Giving credit where credit's due, I'd like to thank the Pacific Coast Air Line Railway for getting me started on this project. This method loosely follows theirs as presented at www.pacificcoastairlinerr.com/grout_logs/.
Begin by using a hobby knife to scrape away any flash that may remain on the logs. The logs are made in "split" molds, so may have a bit of flash along the mold joints. (The logs cut, carve, drill, and sand easily.) It's best to wash the logs prior to painting in warm, soapy water to remove any release agent that may be present. Even though your logs may be white to start with (various resins have been used), prime them with a white-pigmented primer such as Kilz. Next, four washes are applied, allowing time to dry between each. I suggest using a flat brush with approximately 5/8-inch long (15-mm) x 3/8-inch (10-mm) wide bristles to apply the washes. I also prefer to use water-based paints for the logs -- they have a very fast drying time.
To apply a "wash", dab a bit of paint from the bottle/tube on a scrap of cardboard or some other waste material. Wet your log with clear water, dip or dab your brush into the paint, and brush some onto the log. The wetness of the log should help dissolve the paint and it should flow into the surface texture. Add a little clear water with your brush to get the paint to flow even better. Too much water, however, will allow most of the paint to flow to the lowest point -- something to avoid. If this happens, dab the area with a paper towel and start again.
Once the primer has dried, apply a wash of Raw Sienna, as shown above on log 1. Be sure to paint the ends of the logs with this coat. Try to keep all subsequent washes AWAY from the ends. Once dry, add a wash of Burnt Sienna (log 2 in the photo). Too much Burnt Sienna may turn the log very red -- something you probably don't want. To bring the texture out, next apply a wash of Payne's Gray (log 3). This product goes on like a black paint, but dries considerably lighter -- a great advantage to those of us that tend to put too much of a good thing on our models. Finally, if you think your logs need it (it always improves mine), apply a wash of Burnt Umber (log 4). This is a dark brown color that really blends the other washes together and makes the bark look more realistic. Just don't over do it or the log will become too dark. Allow your logs to dry thoroughly.
THAT'S IT! Nothing to it!
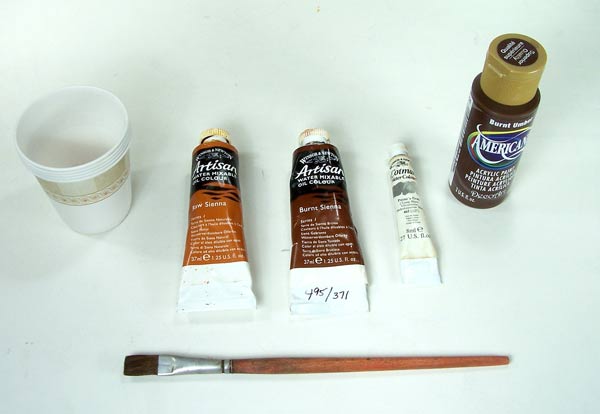
BASIC PAINTS/TOOLS
FOR FINISHING LOGS
Products used:
White Primer: Kilz (spray can)
Raw Sienna: Winsor & Newton's Artisan's Water Mixable Oil Color
Burnt Sienna: Winsor & Newton's Artisan's Water Mixable Oil Color
Payne's Gray: Winsor & Newton's Cotman Water Color
Burnt Umber: Americana (DecoArt)
RETURN TO RAGG'S PARTS